顯示具有 Window Forms篇 標籤的文章。 顯示所有文章

2010年3月9日 星期二

70-511 MCTS: Windows Applications Development with Microsoft .NET Framework 4 考試大綱參考

Windows Form 4.0 的認證考試MCTS大綱已經出來各大概了,不過好像現在考Windows Form 的人比較少,亞當斯把微軟官方網站所條列之重點與比例,整理在下方提供給各位參考:

Building a User Interface by Using Basic Techniques (23%)

  • Choose the most appropriate control class.

    This objective may include but is not limited to: evaluating design requirements and then selecting the most appropriate control based on those requirements; recognizing when none of the standard controls meet requirements; item controls, menu controls, content controls

    This objective does not include: designing a custom control

  • Implement screen layout by using nested control hierarchies.

    This objective may include but is not limited to: using panel-derived controls, attaching properties

    This objective does not include: items controls, control customization

  • Create and apply styles and theming.

    This objective may include but is not limited to: application-level styles, overriding styles, style inheritance, Generic.xaml,  theming attributes

    This objective does not include: data-grid view style sharing

  • Manage reusable resources.

    This objective may include but is not limited to: fonts, styles, data sources, images, resource dictionaries, resource-only DLLs

  • Implement an animation in WPF.

    This objective may include but is not limited to: creating a storyboard; controlling timelines; controlling the behavior when the animation completes; double, color, and point animations; starting an animation from code and from XAML

    This objective does not include: direct rendering updates, implementing key frame animations

Enhancing a User Interface by Using Advanced Techniques (21%)

  • Manage routed events in WPF.

    This objective may include but is not limited to: tunneling vs. bubbling events, handling and cancelling events

    This objective does not include: simple event handling; creating custom events

  • Configure WPF commanding.

    This objective may include but is not limited to: defining WPF commands based on RoutedCommand; associating commands to controls; handling commands; command bindings; input gestures  

    This objective does not include: creating custom commands by implementing ICommand

  • Modify the visual interface at run time.

    This objective may include but is not limited to: adding/removing controls at run time; manipulating the visual tree; control life cycle; generating a template dynamically

    This objective does not include: instantiating forms and simple modification of control properties at runtime

  • Implement user-defined controls.

    This objective may include but is not limited to: deciding whether to use a user/composite, extended, or custom control ; creating a user/composite control; extending from an existing control

    This objective does not include: creating a custom control by inheriting directly from the Control class and writing code

  • Create and display graphics.

    This objective may include but is not limited to: creating and displaying graphics by using geometric transformation; brushes; drawing shapes; clipping; double buffering; overriding Render (WPF) and OnPaint (WinForms); differentiating between retained and non-retained graphics

    This objective does not include: creating and displaying three-dimensional graphics; hit testing; creating images

  • Add multimedia content to an application in WPF.

    This objective may include but is not limited to: media player vs. media element; adding a sound player; images

    This objective does not include: buffering

  • Create and apply control templates in WPF.

    This objective may include but is not limited to: template binding

    This objective does not include: styling and theming; data templating

  • Create data, event, and property triggers in WPF.

Managing Data at the User Interface Layer (23%)

  • Implement data binding.

    This objective may include but is not limited to: binding options, static and dynamic resources, element bindings, setting the correct binding mode and update mode; binding to nullable values

    This objective does not include: binding to a specific data source

  • Implement value converters in WPF.

    This objective may include but is not limited to: implementing custom value converters, implementing multivalue converters

  • Implement data validation.

    This objective may include but is not limited to: handling validation and providing user feedback via the error provider (WinForms) or data templates (WPF), IDataErrorInfo, validation control, form validation and control validation

  • Implement and consume change notification interfaces.

    This objective may include but is not limited to: implementing INotifyPropertyChanged; using INotifyCollectionChanged (ObservableCollection)

  • Prepare collections of data for display.

    This objective may include but is not limited to: filtering, sorting, and grouping data; LINQ; CollectionView (WPF), BindingSource object (WinForms)

  • Bind to hierarchical data.

    This objective may include but is not limited to: TreeView; MenuControl

  • Implement data-bound controls.

    This objective may include but is not limited to: using the DataGridView (WinForms) or DataGrid (WPF) control to display and update the data contained in a data source, implementing complex data binding to integrate data from multiple sources; ItemsControl-derived controls (WPF)

  • Create a data template in WPF.

    This objective may include but is not limited to: implementing a data template selector; using templates with ItemsControl

Enhancing the Functionality and Usability of a Solution (17%)

  • Integrate WinForms and WPF within an application.

    This objective may include but is not limited to: using ElementHosts within WinForms and ControlHosts within WPF; using the PropertyMap property

  • Implement asynchronous processes and threading.

    This objective may include but is not limited to: implementing asynchronous programming patterns; marshalling between threads; freezing UI elements; using timers; Task Parallel Library; parallel LINQ; using the dispatcher; BackgroundWorker component

  • Incorporate globalization and localization features.

    This objective may include but is not limited to: loading resources by locale; marking localizable elements; using culture settings in validators and converters; using language properties and rendering direction properties; working with resource files for localization; determining installed locales; regional settings

  • Implement drag and drop operations within and across applications.

    This objective does not include: Dynamic Data Exchange (DDE)

  • Implement security features of an application.

    This objective may include but is not limited to: configuring Software Restriction Policy (SRP); full trust and partially trusted security; interoperability with legacy CAS policy; User Account Control (UAC)

  • Manage user and application settings.

    This objective may include but is not limited to: creating application settings; creating user settings; loading and saving settings

    This objective does not include: persisting to database

  • Implement dependency properties.

    This objective may include but is not limited to: enabling data binding and animation, property metadata, property change callbacks

Stabilizing and Releasing a Solution (17%)

  • Implement a WPF test strategy.

    This objective may include but is not limited to: automation peer, UI automation, IntelliTrace

  • Debug XAML by using the WPF Visualizer.

    This objective may include but is not limited to: accessing the Visualizer, drilling down into the visual tree, viewing and changing properties

    This objective does not include: setting a breakpoint and stepping through code

  • Debug WPF issues by using PresentationTraceSources.

    This objective may include but is not limited to: animation, data binding, dependency properties

  • Configure a ClickOnce deployment.

    This objective may include but is not limited to: configuring the installation of a WinForms, WPF, or XBAP application by using ClickOnce technology; choosing appropriate settings to manage upgrades

  • Create and configure a Windows Installer project.

    This objective may include but is not limited to: configuring a setup project to add icons during setup, setting deployment project properties, configuring conditional installation based on operating system versions, setting appropriate Launch Conditions based on the .NET Framework version, adding custom actions to a setup project, adding error-handling code to a setup project

  • Configure deployment security settings.

    This objective may include but is not limited to: configuring and integrating UAC by using ClickOnce deployments; setting appropriate security permissions to deploy the application

以上所有資料來自微軟官網,網址為 :http://www.microsoft.com/learning/en/us/exam.aspx?ID=70-511&locale=en-us#tab1

2010年3月4日 星期四

VSTO Integrated Moss 2007 Design (VSTO 2005 整合MOSS 2007網站設計)

存取Moss網站時,瀏覽器只是其中一個常用的Client,另一個功能強大的前端程式其實是Officr,如:Word、Excel、Outlook等等,而Office軟體這個前端應用程式搭配Moss Server才是真正的完整整合,因為一般使用者使用Office時,並不需要另外做訓練,就可以駕輕就熟的使用Office來建立Moss網站,或是上傳文件資料,或是下載資料等等

然而,有時候當使用者使用這些Office時,假設有一些特殊需求無法達成,而必須特過客製化程式來達到目的時,那麼開發VSTO整合Moss就變成一個重要的議題了,在這裡亞當斯要介紹如何透過VSTO的應用程式來把Moss整合到應用程式中。

以下為開發的幾個主要簡易步驟,提供給各位參考:

1. 先執行Microsoft Visual Studio 2005 Tools for the 2007 Microsoft Office System(CH).exe (網址為:http://www.microsoft.com/downloads/details.aspx?FamilyId=5E86CAB3-6FD6-4955-B979-E1676DB6B3CB&displaylang=en),安裝之後,VS2005就可以建立開發VSTO的專案範本。

2. 新增一個「Excel增益集」專案,叫做「ExcelAddIn」

3. 在專案按右鍵選擇加入參考,將Microsoft.SharePoint.dll加入參考

clip_image002[7]

4. 在「ExcelAddIn」專案按右鍵-->加入-->新增項目,選擇「使用者控制項」,並且命名為MOSSUserControl.cs

5. 在MOSSUserControl中設計畫面如下:

clip_image002

6. MOSSUserControl.cs中先匯入主要的命名空間:

using Microsoft.SharePoint;

using Excel = Microsoft.Office.Interop.Excel;

using Office = Microsoft.Office.Core;

7. 在buttonContact的click事件中撰寫程式,針對指定的MOSS網站取出其聯絡人清單中的資料

private void buttonContact_Click(object sender, EventArgs e)
{
    //取得MOSS網站中的聯絡人清單資料  
    SPWeb web = new SPSite(textBoxUrl.Text).OpenWeb();
    SPList list = (SPList)web.Lists["MOSS聯絡人"];
    foreach (SPListItem item in list.Items)
    {
        listBoxContact.Items.Add(item.DisplayName);
    }
}

8. 在buttonExcel的click事件中撰寫程式,將取得的聯絡人資料設定給Excel所選取的範圍(Range),程式碼如下

private void buttonExcel_Click(object sender, EventArgs e)
{
  Excel.Range RangeSelection =  (Excel.Range)Globals.ThisAddIn.Application.Selection;
   RangeSelection.Value2 = listBoxContact.SelectedItem.ToString();
}

9. 打開ThisAddIn專案下Excel資料夾中的ThisAddIn.cs檔,在ThisAddIn_Startup事件程序中,將使用者控制項透過CustomTaskPanes屬性加入Excel中。

MOSSUserControl myControl;
private void ThisAddIn_Startup(object sender, System.EventArgs e)
{
    … …
    myControl = new MOSSUserControl();
    this.CustomTaskPanes.Add(myControl, "Adams InsertData").Visible = true;
}

10. 建置完成,按下F5執行測試。

2009年11月11日 星期三

在.NET中輕鬆快樂叫用Win32 API –2 (.NET easy Call API - 2)

在上一篇文章中,亞當斯介紹使用.NET Call API可以透過http://www.pinvoke.net/ 網站所提供的資訊快速設計,對開發Win32 API的開發者來說,這網站保證一用就上癮。

但亞當斯覺得其實這還不過癮,怎說呢?因為在 .NET中輕鬆快樂叫用Win32 API –1 介紹的前提是必須在連線機制下,才能得到的參考資訊,假設您現在的地方並沒有網路,那麼不就回到原點,躊躇不前了。

別擔心,這個網站有提供貼心的Visual Studio addin的小工具,以下幾個簡單的步驟帶各位來把這小工具裝起來使用:

1. 首先,可以在http://www.red-gate.com/pinvoke/download這個網址下載pinvoke.net所提供的Visual Studio add-in工具。下載完成之後,會看到一個名為pInvoke VS addin.exe的安裝執行檔。(PS:目前這版本只支援到Visual Studio 2005,根據亞當斯實際測試Visual Studio 2008無法Work)

2. 接著針對pInvoke VS addin.exe執行安裝(請注意,安裝過程當中請先將您的Visual Studio關閉,否則可能會發生不預期的錯誤)。

clip_image002

3. 安裝完成之後,開啟Visual Studio開發應用程式時,就可以在選單處看到一個已經安裝完成的「pInvoke.net」選單。

clip_image004

4. 打開一個測試的Winform專案,在撰寫程式碼的表單中,選取「pInvoke.net」選單à點選「Insert PInvoke signatures」,以開啟查詢視窗。

假設我們要查詢的是user32.dll這個Win32 API下的MessageBox方法的話,只需直接輸入MessageBox並按下Search即可查到您所想要的API在.NET中的宣告方式。

clip_image002[1]

1. pInvoke.net設計的非常友善,還可以讓你挑選不同的語言唷,以下是挑選C#後的顯示結果。

clip_image004[1]

2. 將pInvoke.net所查詢出來的win32 API程式定義放入我們的.NET程式碼中,接著寫一小段程式去叫用它。

Private Sub Button1_Click(ByVal sender As System.Object, ByVal e As System.EventArgs) Handles Button1.Click

MessageBox(New IntPtr(0), "Text", "Caption", Convert.ToUInt32(MessageBoxButtons.OK))

End Sub

3. OK! That is Very easy,要這樣寫程式才會快樂咩,往後不管連線或是離線,都可以使用Visual Studio開發應用程式時,快速低使用pInvoke.net來查詢出所要設計的API程式法,程式執行後的結果:

clip_image006

2009年11月10日 星期二

在.NET中輕鬆快樂叫用Win32 API –1 (.NET easy Call API - 1)

開發.NET應用程式,整合也是一項重要的設計議題,在這篇文章中,亞當斯要來跟各位介紹如何快速開發.NET應用程式叫用Win32 API。

基本上使用Visual Studio開發工具設計.NET應用程式,不管是ASP.NET或是WinForm等應用程式,如果要在程式當中叫用OS系統所提供的Win32 API,就必須先了解要叫用的是哪一個API,這個API當中又有多少個function(功能)可以使用,但是開發者不可能將幾千個API所提供的function一個一個背起來,況且每一個function所需要傳遞的參數也不盡相同。

那麼,到底要如何「快速」設計整合Win32 API的應用程式呢?這時候你可能會很直覺的想:「Visual Studio應該直接有提供可以查詢Win32 API的功能吧」,很遺憾的,Visual Studio有提供物件瀏覽器,卻沒有「預設」提供Win32 API瀏覽器,因此對程式設計師來說的確在叫用Win32 API或造成一些困擾。

有鑑於此,首先在這邊介紹一個開發Win32 API非常棒的參考網站:http://www.pinvoke.net/

clip_image002

Win32 API分門別類區分出來,那個dll中有哪些function,更重要的是,它有提供.NET叫用這些API的範例程式碼,也就是說你想要叫用哪一個功能,點選之後,網站會顯示出在.NET程式中宣告此Win32 API的方式,以及程式叫用的方法,這樣才能讓開發者快速開發。

舉個例子,假設我現在想要叫用user32.dll中的MessageBox功能,那麼在此網站中查詢的結果如下圖所示,可以得知該如何在.NET中宣告對應的程式:

clip_image002[6]

甚至連.NET應用程式如何叫用的範例程式,都有提供,請參考下圖:

clip_image004

2008年12月3日 星期三

設計可拖拉圖片(DragDrop Image)的Winform表單程式

如果想要在Winform中設計讓使用者可以拖拉圖片的功能,那麼就可以叫用PictureBox控制項的DoDragDrop方法來初始化拖曳作業,DoDragDrop方法需要兩個參數:一為代表正準備複製至DataObject的資料物件,另一個是指定此資料所允許之拖曳效果的DragDropEffects執行個體。

亞當斯來說明以一下此功能的設計步驟:

  1. 先準備一個Form表單,將準備移動的圖片(圖片中主角就是亞當斯最引以為傲,會寫Cat#的MiMi)先加到專案中,這邊亞當斯把圖片加入到專案的資源檔中,並且設定為內崁。ImageDragDrop01
  2. 在From畫面上配置兩個PictureBox控制項,先把左邊的PictureBox控制項Image圖片來源,設定為加入資源檔的圖片,右邊的PictureBox則不做任何設定。ImageDragDrop02
  3. 接下來這個步驟很重要因為PictureBox控制項的AllowDrop屬性沒辦法直接在設計的屬性視窗中設定,所以必須先在Form1表單的Load事件中,將目標PictureBox的AllowDrop屬性設定為True,接著在準備要拖曳的PictureBox之MouseDown事件中起始拖曳作業,程式碼如下:
    Private Sub Form1_Load(ByVal sender As System.Object, ByVal e As System.EventArgs) Handles MyBase.Load
      '設定PictureBoxRight可以允許拖拉
      PictureBoxRight.AllowDrop = True
    End Sub
    Private Sub PictureBoxLeft_MouseDown(ByVal sender As Object, ByVal e As System.Windows.Forms.MouseEventArgs) Handles PictureBoxLeft.MouseDown
      If PictureBoxLeft.Image IsNot Nothing Then
        PictureBoxLeft.DoDragDrop(PictureBoxLeft.Image, DragDropEffects.Move)
      End If
    End Sub


  4. 設定拖放作業中的目標PictureBox置放效果,先用DragEventArgs物件Data屬性的GetDataPresent方法判斷為圖片,再設定DragDropEffects列舉常數(亞當斯的這個範例是使用:Move)。
    Private Sub PictureBoxRight_DragEnter(ByVal sender As Object, ByVal e As System.Windows.Forms.DragEventArgs) Handles PictureBoxRight.DragEnter
      If e.Data.GetDataPresent(DataFormats.Bitmap) Then

        e.Effect = DragDropEffects.Move

      End If

    End Sub


  5. 在目標的PictureBox之DragDrop事件中,設定PictureBox的Image屬性為拖曳過來的圖片。
    Private Sub PictureBoxRight_DragDrop(ByVal sender As Object, ByVal e As System.Windows.Forms.DragEventArgs) Handles PictureBoxRight.DragDrop 

      If e.Data.GetDataPresent(DataFormats.Bitmap) Then
        PictureBoxRight.Image = CType(e.Data.GetData(DataFormats.Bitmap), Image)

        PictureBoxLeft.Image = Nothing

      End If

    End Sub


  6. 設計好表單後,執行程式,並且將左邊的PictureBox圖片直接拖曳到右邊的PictureBox,喔耶~成功了!!不過亞當斯只有撰寫從左邊拉到右邊的功能唷,如果你想要再從右邊拉到左邊,那麼就如法泡製整個設計步驟即可^_^。ImageDragDrop03

2008年11月11日 星期二

ToolStrip控制項(2)-ToolStripButton和ToolStripProgressBar應用

ToolStripButton是可包含文字和影像的可選取項目,透過ToolStripButton可以建立同時支援文字和影像的工具列按鈕,最主要的事件當然就是Click事件囉,因為畢竟ToolStripButton與一般按鈕的預作方式雷同。

亞當斯來做個簡單示範,首先先拉一個Timer控制項到表單畫面中,設定Interval屬性為500(0.5秒的意思)。接著表單中先加入ToolStrip控制項,新增一個ToolStripButton,並且直接雙擊滑鼠,在Click的事件程序中加入啟用計時器的程式碼即可。

Timer1.Enabled = True

ToolStripProgressBar 控制項從視覺上指示長時間作業的進度,會以不同色彩由左到右填滿的形式列來顯示作業進度。 要特別注意的是:ToolStripProgressBar 只能置於水平方向,通常我們會用ToolStripProgressBar 來顯示一些需要長時間進行動作的進度監控或顯示資訊,讓使用者可以得知目前系統的作業進度為何,例如:下載檔案、複製檔案或是存取大量資料、列印文件等等。

如果要修改ToolStripProgressBar顯示的數值,並不一定要直接變更 Value 屬性,可以使用Step屬性來指定Value將要遞增的特定數值,再呼叫PerformStep方法來遞增。若要讓遞增數值有所變化,則可以使用 Increment 方法,並指定用來遞增 Value 屬性的值。接著亞當斯在ToolStrip中加入ToolStripProgressBar,並且設定相關屬性:

  • Maximum:100
  • Minimum:0
  • Step:10
  • Style:Continuous

然後在Timer的Tick事件中,加入以下程式碼,去改更ToolStripProgressBar顯示的數值:
ToolStrip04

將應用程式執行,並且按下ToolStripButton啟動計時器,就可以看到ToolStripProgressBar的數值會有所變化了。
ToolStrip05

2008年11月10日 星期一

ToolStrip控制項(1)-ToolStrip設計簡介

ToolStrip控制項為 Windows 工具列物件提供容器,類似VS.NET2003開發WinForm的ToolBar控制項,基本上在VS2008設計WinForm會希望用ToolStrip來取代ToolBar,不過基本上還是相容的。

ToolStrip控制項中主要有幾大類的控制項可以設定,分別為:

  • ToolStripButton:近似於熟知的Button控制項,以按鈕的型態呈現在工具列上。按下按鈕會觸發並執行ToolStripButton.Click事件處理常式裡的程式。
  • ToolStripLabel:包含Label控制項,以及LinkLabel控制項的功能,當其IsLink屬性為False時,只會在工具列上顯示Text屬性裡包含的文字。而當IsLink屬性為True時,ToolStripLabel控制項便會類似於LinkLabel控制項。
  • ToolStripSeparator:ToolStripSeparator控制項是用來區隔工作列不同群組項目使用的控制項。
  • ToolStripSplitButton:結合ToolStripButton控制項,以及ToolStripDropDownButton控制項的功能,它包含一個獨立的按鈕以及一個下拉式選單,各自均有獨立的滑鼠點擊事件,ToolStripSplitButton.Click事件是用來回應按鈕點擊,而ToolStripMenuItem.Click則可用來回應功能表裡每一個選項的點擊動作。
  • ToolStripDropDownButton:允許為按鈕建立一個對應的下拉式選單。
  • ToolStripComboBox:近似於ComboBox控制項,支援Simple、DropDown以及DropDownList等不同的樣式,此外,也透過Items集合來管理其所屬的清單項目。
  • ToolStripTextBox:與TextBox控制項非常相似,與TextBox控制項最大的差異是,ToolStripTextBox控制項並不支援MultiLine屬性。
  • ToolStripProgressBar:與標準的ProgressBar控制項近似,ToolStripProgressBar控制項的外觀由Style屬性決定。可以透過叫用Increment以及PerformStep這兩個方法來改更進度。下列為Style屬性設定值:

    Blocks:增加 ProgressBar 中的分段區塊數,以表示進度
    Continuous: 增加 ProgressBar 中的平滑連續列大小,以表示進度
    Marquee:以跑馬燈形式在 ProgressBar 中連續捲動區塊,以表示進度

如果在表單中把ToolStrip中每一種都加入的話,看起來應該會像以下圖形,按照順序分別為ToolStripButtonToolStripLabelToolStripSplitButtonToolStripDropDownButtonToolStripComboBoxToolStripTextBoxToolStripProgressBar。

ToolStrip01這樣的設計方式都然要自己去設定控管這些項目的功能為何,其實 ToolStrip預設有提供一組系統常用且已經設定好的工具列按鈕,讓開發者直接使用,不過要加入這個預設的功能,可是讓亞當斯找好久,熊熊忘記要設定哪個地方才能加入,後來發現,原來遠在天邊,近在眼前啊!

只要對著ToolStrip按下右鍵,選擇插入標準項目即可。

ToolStrip02

插入後,就會有一組標準的系統工具列可以使用了。
ToolStrip03

2008年4月27日 星期日

使用鍵盤Keyboard操控Winform(2)-傳送按鍵SendKey對照表

亞當斯在使用鍵盤Keyboard操控Winform(1)-移動控制項焦點中提到使用鍵盤的相關設計方式,不過使用SendKey的Send方法時,還是要注意所需要設定的按碼鍵,因為基本上,每一個按鍵由一或多個字元表示。若要指定單一鍵盤字元,直接使用字元本身即可。

例如,若要表示字母 A,就傳遞字串「A」至這個方法,若要表示一個以上的字元,則附加每一個額外的字元至先前的字元,像是要表示字母 A、D、A、M 及 S,請將參數指定為「ADAMS」。

另外,亞當斯覺得要特別注意的是,若要指定當按下如 ENTER 或 TAB 鍵及表示動作而非字元的按鍵時,請使用下表中的按鍵對照表:

按鍵 按鍵碼
退格鍵 {BACKSPACE}、{BS} 或 {BKSP}
BREAK {BREAK}
CAPS LOCK {CAPSLOCK}
DEL 或 DELETE DEL 或 DELETE
向下鍵 {DOWN}
END {END}
ENTER {ENTER}or ~
ESC {ESC}
HELP {HELP}
HOME {HOME}
INS 或 INSERT INS 或 INSERT
向左鍵 {LEFT}
NUM LOCK {NUMLOCK}
PAGE DOWN {PGDN}
PAGE UP {PGUP}
PRINT SCREEN {PRTSC} (保留供日後使用)
向右鍵 {RIGHT}
SCROLL LOCK {SCROLLLOCK}
TAB {TAB}
向上鍵 {UP}
F1 {F1}
F2 {F2}
F3 {F3}
F4 {F4}
F5 {F5}
F6 {F6}
F7 {F7}
F8 {F8}
F9 {F9}
F10 {F10}
F11 {F11}
F12 {F12}
F13 {F13}
F14 {F14}
F15 {F15}
F16 {F16}
數字鍵台加號 {ADD}
數字鍵台減號 {SUBTRACT}
數字鍵台乘號 {MULTIPLY}
數字鍵台除號 {DIVIDE}


若要指定 SHIFT、CTRL 和 ALT 鍵任意組合的按鍵,請在按鍵碼之前使用一或多個下列的程式碼:

按鍵 按鍵碼
SHIFT +
CTRL ^
ALT %


若要指定當按下其他數個按鍵時,應該按住的 SHIFT、CTRL 和 ALT 的任意組合,請將那些按鍵的程式碼置於括號中。例如,若要指定在按 A 和 D 時按住 SHIFT 鍵,請使用「+(AD)」,若要指定在按 A 時按住 SHIFT 鍵,然後按 D 但不按住 SHIFT 鍵,請使用「+AD」;若要指定重覆的按鍵,請使用格式 {key number},必須在按鍵和數目之間放置空格,例如,{LEFT 5} 表示按向左鍵 5 次;{A 10} 表示按 A 鍵 10 次。

2008年4月26日 星期六

使用鍵盤Keyboard操控Winform(1)-移動控制項焦點

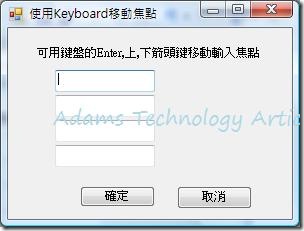
開發Winform程式時, 可以將表單設計為使用鍵盤的Enter,上,下箭頭鍵移動表單上控制項的輸入焦點,根據亞當斯的觀察,這種操作方式在很多大型主機上,如AS400等系統中都是這樣的操作模式,所以其實很多使用者都已經習慣這樣的操作模式了,然而Winform也有提供這樣的設計功能,只是幾乎很少被提到! 剛好上課時有同學提出這個問題,亞當斯就在這邊紀錄一下設計方式給各位參考。假設有一個表單畫面如下:

KeyboardInput01

用鍵盤移動控制項焦點的設計方式有以下兩個重點步驟:

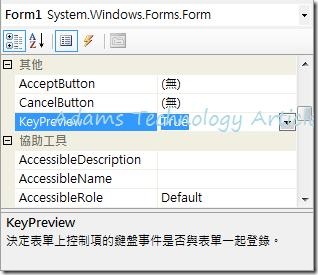
1.設定Form的KeyPreview 屬性,指出表單是否在事件傳送至具有焦點的控制項之前,要接收按鍵事件,當設定這個屬性為 true,表單將接收所有 KeyPress、KeyDown 和 KeyUp 事件。
KeyboardInput02

2.在From的KeyDown事件中,使用e.KeyCode判斷按下鍵盤的哪一個按鍵,如果按下的是:Enter或是上、下鍵的話,就移動表單中的控制項焦點,程式碼如下:

Private Sub Form1_KeyDown(ByVal sender As Object, ByVal e As System.Windows.Forms.KeyEventArgs) Handles Me.KeyDown   
  Select Case e.KeyCode
    Case Keys.Enter, Keys.Down
      SendKeys.Send("{TAB}")
    Case Keys.Up
      SendKeys.Send("+{TAB}")
  End Select
End Sub

下列檔案為此篇文章的範例程式,有興趣的朋友可自行下載:


2008年4月25日 星期五

Windows Form 中事件(Event)的順序

開發表單程式時,對事件順序的認知其實蠻重要的,亞當斯以前開發Winform專案時有時候為了控制某些邏輯的先後順序,傷透了腦筋,因為都必須要控管出現的順序或是運作方式等,不過透過Winform event的搭配控管就可以節省不少需要自己去控管的部分了。

微軟MSND中也提到:對於需要輪流處理 Windows Form 應用程式中每個事件的開發人員來說,事件的引發順序就十分重要。當某個狀況呼叫嚴密的事件處理,如重新繪製表單的部分時,有必要了解事件在執行階段時的明確引發順序。以下列出亞當斯整理MSDN後的Windows Form 中事件的順序,以方便日後上課或是設計專案時參考。

Form 和 Control 有關啟動與關閉的事件順序為可分為兩大類,當 Windows Form 應用程式啟動時,會以下列順序引發主要表單的啟動事件:

  • Control.HandleCreated
  • Control.BindingContextChanged
  • Form.Load
  • Control.VisibleChanged
  • Form.Activated
  • Form.Shown

當應用程式關閉時,會以下列順序引發主要表單的關閉事件:

  • Form.Closing
  • Form.FormClosing
  • Form.Closed
  • Form.FormClosed
  • Form.Deactivate

焦點和驗證事件:當透過使用鍵盤按鍵 (TAB、SHIFT+TAB 等)、呼叫 Select 或 SelectNextControl 方法,或是將 ActiveControl 屬性設定成目前的表單等作法,變更焦點時,Control 類別的焦點事件就會以下列順序發生:

  • Enter
  • GotFocus
  • Leave
  • Validating
  • Validated
  • LostFocus

當使用滑鼠或呼叫 Focus 方法來變更焦點時,Control 類別的焦點事件會以下列順序發生:

  • Enter
  • GotFocus
  • LostFocus
  • Leave
  • Validating
  • Validated

2008年4月24日 星期四

ListView 控制項的設計要素(2)-設計Group與套用View檢視模式

ListView 群組功能可建立邏輯上與 ListView 項目相關的視覺化群組,主要功能為協助使用者尋找所尋找的項目,方法是將項目分隔成有用的分類,若要使用群組功能,則是將一或多個 ListViewGroup 物件加入至 ListView 控制項的 Groups 集合。
設計步驟為:

1.先設定ListView 的Groups 屬性,加入想要分類的群組,這邊亞當斯加入兩個Group,並且設定Header和Name:

ListView06 2.修改ListItemView的Group屬性,指定為隸屬的群組。
ListView07

接著透過ComboBox控制項來動態控制ListView 的檢視功能( View屬性),View 屬性設定為各項目用大圖示或小圖示顯示,或用垂直清單來顯示的各項項目。最豐富的選項是詳細資料檢視,不只允許檢視項目,更有為各項項目指定的任何子項目。各項項目都顯示在格線中,作垂直列示,各項項目的子項目則顯示在資料行中,附有資料行行首。Details檢視是對使用者顯示出資料庫資訊的完美方式。

在表單中先撰寫以下程式,先使用System.Enum.GetNames(GetType(View))載入所有的View,在使用System.Enum.Parse(GetType(View), comboBox1.Text)取出指定給ListView控制項即可,將ListView的所有View先在入ComboBox控制項以便動態設定ListView:

  Private Sub Form1_Load(ByVal sender As System.Object, ByVal e As System.EventArgs) Handles MyBase.Load
comboBox1.DataSource = System.Enum.GetNames(GetType(View))
End Sub
Private Sub comboBox1_SelectedIndexChanged(ByVal sender As System.Object, ByVal e As System.EventArgs) Handles comboBox1.SelectedIndexChanged
listView1.View = CType(System.Enum.Parse(GetType(View), comboBox1.Text), View)
End Sub


接著就可以在程式執行過程中,隨時去變化ListView的View模式了,以下為亞當斯所測試的每一個不同的結果樣式。

ListView08ListView09ListView12 ListView11 ListView10

2008年4月23日 星期三

NotifyIcon 與contextMenuStrip的搭配應用

Windows Form NotifyIcon 控制項通常用來為在背景中執行的處理序 (Process) 顯示圖示,而且大部分時間不會顯示使用者介面。MSN程式或是防毒軟體即為範例之一,讓一般的User可在工作列的狀態告知區按一下圖示(Icon)來存取。每個 NotifyIcon 控制項都會在狀態區顯示一個圖示。假設想要執行三個背景處理序,每個都需要獨立的顯示圖示,那麼就必須將三個 NotifyIcon 控制項加入表單分別設定才行。

亞當斯接下來簡單說明一下NotifyIcon 搭配contextMenuStrip的設計方式:

  1. 先在表單中加入一個contextMenuStrip控制項,並且設定幾個ToolStripMenuItem,例如:開始、停止、離開等。NotifyIcon01
  2. 拖拉一個NotifyIcon控制項到畫面中,設定ContextMenuStrip(取得或設定與 NotifyIcon 關聯的快速鍵功能表)為ContextMenuStrip1,並設定BalloonTipText、BalloonTipIcon 和 BalloonTipTitle 來指定汽球提示的文字、圖示和標題。
  3. NotifyIcon 主要屬性是 Icon 和 Visible,因此設定Icon 為一個影像檔,並設定Visible為true。NotifyIcon02
  4. 最後可以呼叫 ShowBalloonTip 方法來指定要顯示提示的時間範圍,為 NotifyIcon 顯示提示。程式碼為:
    NotifyIcon1.ShowBalloonTip(3000)
  5. 應用程式執行後的結果,就會在右下角的出現Icon,對著Icon按滑鼠右鍵,會彈出contextMenuStrip所設定的ToolStripMenuItem。另外按下表單中按鈕之後,Icon處就會彈出提示視窗,然後出現三秒鐘。
    05-ContextMenuStrip Work 04-ShowBallonTip

2008年4月22日 星期二

PictureBox的設計應用-載入衛星雲圖

Windows Form PictureBox 控制項是用來顯示點陣圖、GIF、JPEG、中繼檔 (Metafile) 或圖示格式的圖形。顯示的圖片是由可在執行階段或設計階段設定的 Image 屬性所決定的。要載入圖形有以下幾種常見方式:

  1. 直接設定Image屬性為本機資源下某個影像檔的路徑
  2. 設定 ImageLocation 屬性,然後使用 Load 方法同步載入影像或是使用 LoadAsync 方法非同步載入影像
  3. 設定Image屬性為專案資源檔(Resource.resx)檔中的影像

另外一個最重要的屬性就是:SizeMode 屬性,這屬性可以控制影像和控制項間的搭配。

接下來亞當斯使用以上第二種方式來載入圖形,而這個圖形:衛星雲圖,則是根據現在的時間,實際去偵測現在天氣的概況,而呈現完成的圖示。那麼從哪邊取得衛星雲圖呢?答案就是:中央氣象局全球資訊網。

其實程式很簡單,在Winform畫面上,先拖拉一個Button和PictureBox 控制項,然後在Button的Click事件中加入以下程式碼即可,首先將現在的日期時間傳入到中央氣象局全球資訊網的一個位置圖,接著設定PictureBox 的ImageLocation 屬性:
DemoPictureBox 將Winform執行起來,按下按鈕就可以看到衛星雲圖呈現在我們的表單中了,呵呵~真是一個蠻酷的功能。
PictureBox02

2008年4月21日 星期一

ListView 控制項的設計要素(1)-完整設計模式

Windows Form ListView 控制項顯示具有圖示的項目清單,可以使用清單檢視來建立如 Windows 檔案總管右窗格的使用者介面。ListView 主要設定的屬性有下列幾個:Columns 、Items、View和Group等等。透過這幾個屬性可以設計一個常用的介面讓一般User使用。

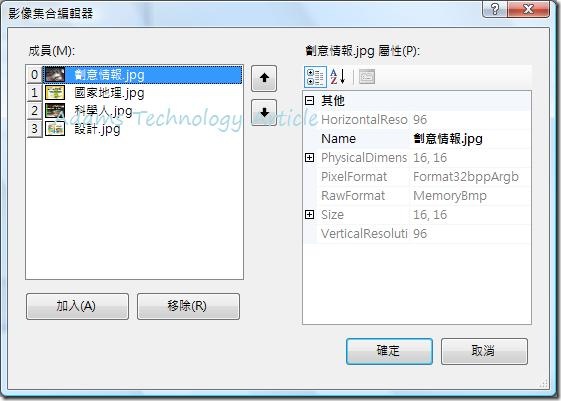
首先,如果要在ListView 中顯示圖示,當然可以先準備ImageList控制項將想要呈現的圖片先設定好,然後先來設定ListView的Column屬性,Columns 屬性允許存取 ListView.ColumnHeaderCollection,它儲存將控制項的 View 屬性設定為 Details 時所顯示的資料行行首。這邊亞當斯先設定三個欄位以呈現:雜誌名稱、單價、出刊日的檢視樣式。

ListView01

如果想要在ListView中的每個項目都有圖片可以呈現的話,可以設定ImageList控制項中的Images屬性,將圖示先封裝到這個控制項中,然後指定給ListView的LargeImageList屬性或是SmallImageList屬性即可。
ListView02

ListView 控制項的主要屬性是 Items,其中包含控制項顯示的項目,主要功能是取得包含控制項中所有項目的集合,使用這個屬性傳回的 ListView.ListViewItemCollection,可以新增項目、移除項目、和取得項目的計數,這邊亞當斯就把要準備呈現的幾筆項目資料逐一設定,分別為:地理雜誌、科學和創意情報。設定時,可以先加入一個ListViewItem,然後設定Text和ImageKey這兩個比較主要的屬性,就可以將比較完整的項目呈現出來。

ListView03 基本上,整個設定完ListView 的感覺就如同下圖所示。還可以搭配很多其他的屬性變化啦,譬如說View的模式啦,Group群組模式啦...等等的,各位有興趣的話,可以多參考MSDN中的說明囉!
ListView04 另一方面,當然也可以動態使用程式碼來加入其中一個ListViewItem,程式碼如下:
ListView05